Monday, May 12, 2014

Sunbonnet Sue Finished

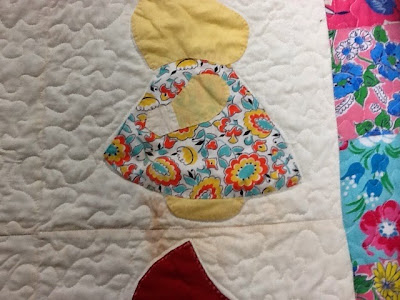
A couple of  years ago while vacationing in Ormond Beach, Florida, Tom and I stopped at an Estate Sale. As we wandered around the dilapidated house, I could see signs of the former occupant's declining health.  A walker, oxygen tank, handicap bars.  It made me sad as I walked around and shopped through the belongings.  I went into one of the back bedrooms and spotted some linens.  I was fascinated to find a neglected unfinished quilt top.  I always look for quilt tops and even though this one was a little damaged, I couldn't help but buy it.  I thought it would be a nice tribute to the owner to complete a project that she couldn't.

A few months after we got home, I took the quilt top to my local quilt shop and found a fabric to add to it for a border and backing.  I quickly added the border, but then didn't get to the next step of making the quilt sandwich and quilting it.  Then, suddenly we found our new home and were packing and moving.  I didn't have any time to think about Sunbonnet Sue or any other quilting project.  Recently, while organizing my newly renovated sewing room, I found the forgotten Sunbonnet Sue quilt top.  I decided it was time to finally finish the quilt. 

And here she is...


Isn't she pretty?  The pink fabric is the new fabric I added.  It is interesting to look at all of the old fabrics and think about where they came from---old clothes or linens?   


There are a few places that have some kind of stains, probably from sitting in a humid closet neglected for years.  I don't mind.   It is part of the character of the quilt.  I quilted it on my regular domestic sewing machine in a meandering pattern.  

I used a pieced binding and later found the binding that I had forgot I had cut out of the pink fabric.  Oops!  I will use that on another project.

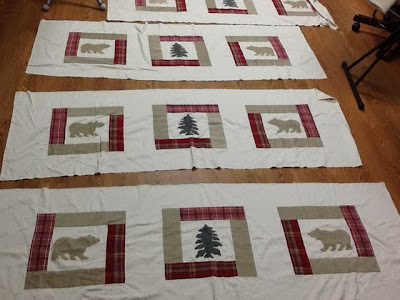
One day I will finish another garage sale find.  Here is a peek:


I envision adding a woodsy fabric between these panels and using it in the mountain cabin we would like to someday own.  Or, maybe I will just give it to a friend who owns a mountain cabin.  We will see how long it takes me to finish this project....

Do you ever look for unfinished projects?

Linked to WIP Wednesdays at Freshly Pieced.

Sunday, May 11, 2014

Sewing Room Renovation

Since moving to our 20 year old ranch house in need of love one year ago, I really have had very little time to do much sewing or quilting.  DIY and home decorating projects have taken up most of our free time and spare $$ too!  If you would like to see more of what we are working on head over to A Time for Home.

Since I don't have any sewing posts ready, I thought I would share the transformation of my sewing/quilting room.

This picture is of the house when it was on the market.  The renters were using this room as an extra bedroom.  Notice the horrible glossy gold curtains on the left of the picture.  You will see what they were covering in a later picture.  The paint on the walls was neutral, but they had done a terrible job painting.  The old bright royal blue paint was showing through in many areas.  And, how about that horrible blue/green Berber carpet?
 

Here is the room when we moved in to the house.  The only thing we did was remove the gold curtains covering the desk area and built in cabinets. We wanted to be able to use this room for guests when needed so we put a daybed that we owned in the room.


We rearranged the room and put the day bed on the back wall.  This arrangement seems to work better.  Scroll through the next several pictures and notice the green and wood paneling built in cabinet and desk area. 


Yikes!  What a mess and that green cabinet!  I do like the dowels that Tom hung for my batting.


Tom painted the entire room a light blue and painted the wood paneling and green cabinet a bright white.


I didn't want the make-shift desk area.  I thought I would have Tom install shelves for all of my fabric and supplies.  It turned out that whomever built the desk actually sheet rocked around the desk. 


It was a bear to remove and Tom had to repair the drywall.


Cleared out for painting.


Tom removed the carpet before painting.


We chose luxury vinyl tile that looks like wood for the new flooring.  It is nice to walk on and easy to clean.  Since this is a basement, it is better than putting real wood on the floors.


Finished floor and freshly painted walls!


Time to put everything back and organize.


We had a wire shelf that I ended up using for fabric storage because....


it occurred to me that the recessed area where the desk had been was perfect for my 6 needle embroidery machine.  It is so nice to have it out of the middle of the room and have my thread organized nearby.


I have a nice area for rulers, books and magazines.  I can even use this area for cutting fabric.


So how much did this project cost?  We did all the labor ourselves and didn't add any new furnishings.  So the costs were for the luxury vinyl tile floor, paint, and drywall repair supplies.

Here is the breakdown:

Traffic Master Allure Vinyl Plank Flooring -- $1.79/sq foot approximately $1100

Valspar Paint - color "Ghost Ship"  - approx $30/gallon after rebate-total $60

Sheetrock repair items--we had these items on hand from earlier progects--$0

So for less than $1200.00 I have a nice room to go and spend time creating.

Now if I can just make the time to sew....


Linked up to:  Thrifty Thursdays @ Living Well Spending Less
                     Fabulous Frugal Thursday @ A Life in Balance